
Avoiding Common Electrical Upgrade Mistakes: Compliance, Cost, and Safety Insights for Homeowners
Introduction: The High Stakes of Home Electrical Upgrades
Upgrading your home’s electrical system is one of the most impactful improvements you can make, increasing safety, supporting modern appliances, and boosting your property’s value. But electrical upgrades are complex projects that trip up even experienced DIYers and seasoned contractors. A seemingly minor oversight can lead to costly code violations, failed inspections, safety hazards, or even disastrous electrical fires. That’s why understanding and avoiding the most common mistakes is crucial before you touch a single wire or schedule a permit inspection.
This comprehensive guide delivers practical insights for homeowners considering panel upgrades, new circuits, or rewiring projects. We’ll dig into compliance essentials, cost breakdowns, permit requirements, and expert safety strategies. Whether you’re planning a full-service upgrade or simply adding outlets, you’ll learn how to sidestep expensive pitfalls and ensure a safe, code-compliant, and future-proof electrical system. Let’s illuminate the smartest way to power up your home improvement plans.
Understanding the Scope: When and Why Electrical Upgrades Are Needed
Signs Your Electrical System Needs an Upgrade
- Frequent circuit breaker trips or blown fuses
- Flickering or dimming lights when using appliances
- Outlets or switches that feel warm or emit burning smells
- Reliance on extension cords or power strips due to too few outlets
- Presence of outdated knob-and-tube or aluminum wiring
- Planning for high-powered appliances or electric vehicle charging
Project Scale: From Minor Additions to Full Upgrades
- Small projects: Adding outlets, upgrading fixtures, or installing dedicated appliance circuits
- Medium projects: Subpanel installations, adding circuits for additions, or partial rewiring
- Major projects: Main service panel upgrades (e.g., from 100A to 200A), whole-house rewiring, addressing hazardous wiring
Key Benefits of Modernizing Your Electrical System
- Improved safety and fire prevention
- Capacity for modern electronics and appliances
- Better energy efficiency and lower bills
- Increased home resale value and marketability
- Peace of mind and compliance with current electrical codes
Cost Breakdown: What to Expect and How to Budget Wisely
Factors Affecting Electrical Upgrade Costs
- Project scope (number of circuits, ampacity, rewiring needs)
- Home size, age, and accessibility of wiring
- Labor rates in your region
- Material choices: copper vs. aluminum wiring, panel brands, AFCI/GFCI outlets
- Permit and inspection fees
- Potential need for drywall repair, painting, or other finishing work
Typical Price Ranges
- Adding an outlet or fixture: $150–$350 each
- Installing a subpanel: $500–$2,000
- Upgrading main service panel (100A to 200A): $2,000–$5,000
- Whole-house rewiring (1,500 sq ft): $8,000–$15,000
Always get at least three itemized bids from licensed electricians. Factor in 10–20% for unforeseen expenses, especially in older homes where surprises behind the walls are common.
Hidden Costs and Budgeting Tips
- Permit and inspection fees: $100–$500 depending on locality
- Temporary power or generator rental if you can’t stay in the home
- Wall/ceiling repairs after wiring runs
- Upgrading main utility service lines if required by the utility company
- Code-mandated upgrades (e.g., AFCI protection, tamper-resistant outlets)
Set up a contingency fund and clarify with your electrician what is and isn’t included in the contract.
Common Compliance and Permit Mistakes (and How to Avoid Them)
Mistake #1: Skipping Permits or Unpermitted Work
Many homeowners are tempted to save money by skipping permits, but this is a major mistake. Unpermitted work can jeopardize insurance coverage, cause problems during resale, and result in hefty fines or mandatory costly rework if discovered. Always check with your local building department about required permits for electrical projects, no matter the size.
Mistake #2: Hiring Unlicensed Contractors
Unlicensed or unqualified electricians may offer lower bids, but they often cut corners on code compliance and safety. Always verify licenses, insurance, and references. Ask for a copy of their contractor’s license and confirm it’s current with your state or local authority.
Mistake #3: Ignoring Local Code Updates
National Electrical Code (NEC) updates every three years, but local jurisdictions may have additional or amended rules. For example, some areas may require arc-fault circuit interrupters (AFCIs) or ground-fault circuit interrupters (GFCIs) in more locations than the NEC minimum. Always verify the latest requirements with your local inspector before work begins.
Mistake #4: Inadequate Documentation
Keep all permits, inspection reports, and as-built diagrams for your records. This documentation protects you in case of future insurance claims, home sales, or warranty issues. Take photos before and after walls are closed up.
Safety First: Essential Precautions and Best Practices
Why Electrical Work Is High-Risk
- Even low-voltage circuits can cause severe injury or death if mishandled.
- Incorrect installations may create hidden fire hazards that take months or years to manifest.
- Improperly grounded or bonded systems can expose the entire household to shock risk.
Key Safety Tips
- Always shut off power at the main panel before working on any circuit. Use a non-contact voltage tester to confirm circuits are dead.
- Wear insulated gloves and use tools with rubberized grips.
- Never work alone—have a partner nearby in case of emergency.
- Be extremely cautious in damp or wet locations (e.g., basements, bathrooms). Install GFCI protection where required.
- Label all circuits clearly during and after the upgrade for future maintenance and emergency response.
When to DIY and When to Call a Pro
Replacing light fixtures or outlets may be DIY-friendly for skilled homeowners. However, panel upgrades, new circuits, or any work inside the main service panel should always be done by a licensed electrician. If you’re unsure, err on the side of caution and consult a professional.
Step-by-Step: The Electrical Upgrade Process Explained
Step 1: Assess Your Needs
- Inventory current and anticipated power needs (appliances, HVAC, electric vehicles, etc.).
- Identify problem areas (overloaded outlets, flickering lights, etc.).
- Consult with a licensed electrician for a thorough evaluation.
Step 2: Gather Bids and Choose a Contractor
- Request detailed, apples-to-apples bids from at least three electricians.
- Compare scope, brand of materials, warranty, and timeline.
- Check reviews and verify licensing/insurance.
Step 3: Obtain Permits and Approvals
- Submit plans and application to your local building department.
- Coordinate with utility company if upgrading service lines or meter base.
- Schedule inspections as required (rough-in, final, etc.).
Step 4: Plan for Temporary Power and Access
- Arrange for temporary power if necessary (especially for major upgrades).
- Clear access to panels, attics, and crawl spaces.
- Protect floors and belongings from dust and debris.
Step 5: Execute the Upgrade
- Electrician installs new panel, wiring, circuits, and outlets as specified.
- Old wiring is removed or made safe per code.
- All connections are made using approved methods and materials.
Step 6: Inspection and Finalization
- City or county inspector checks work for code compliance and safety.
- Any deficiencies are corrected before final approval.
- Walls/ceilings are repaired and repainted as needed.
- Label new circuits and update your home’s electrical map.
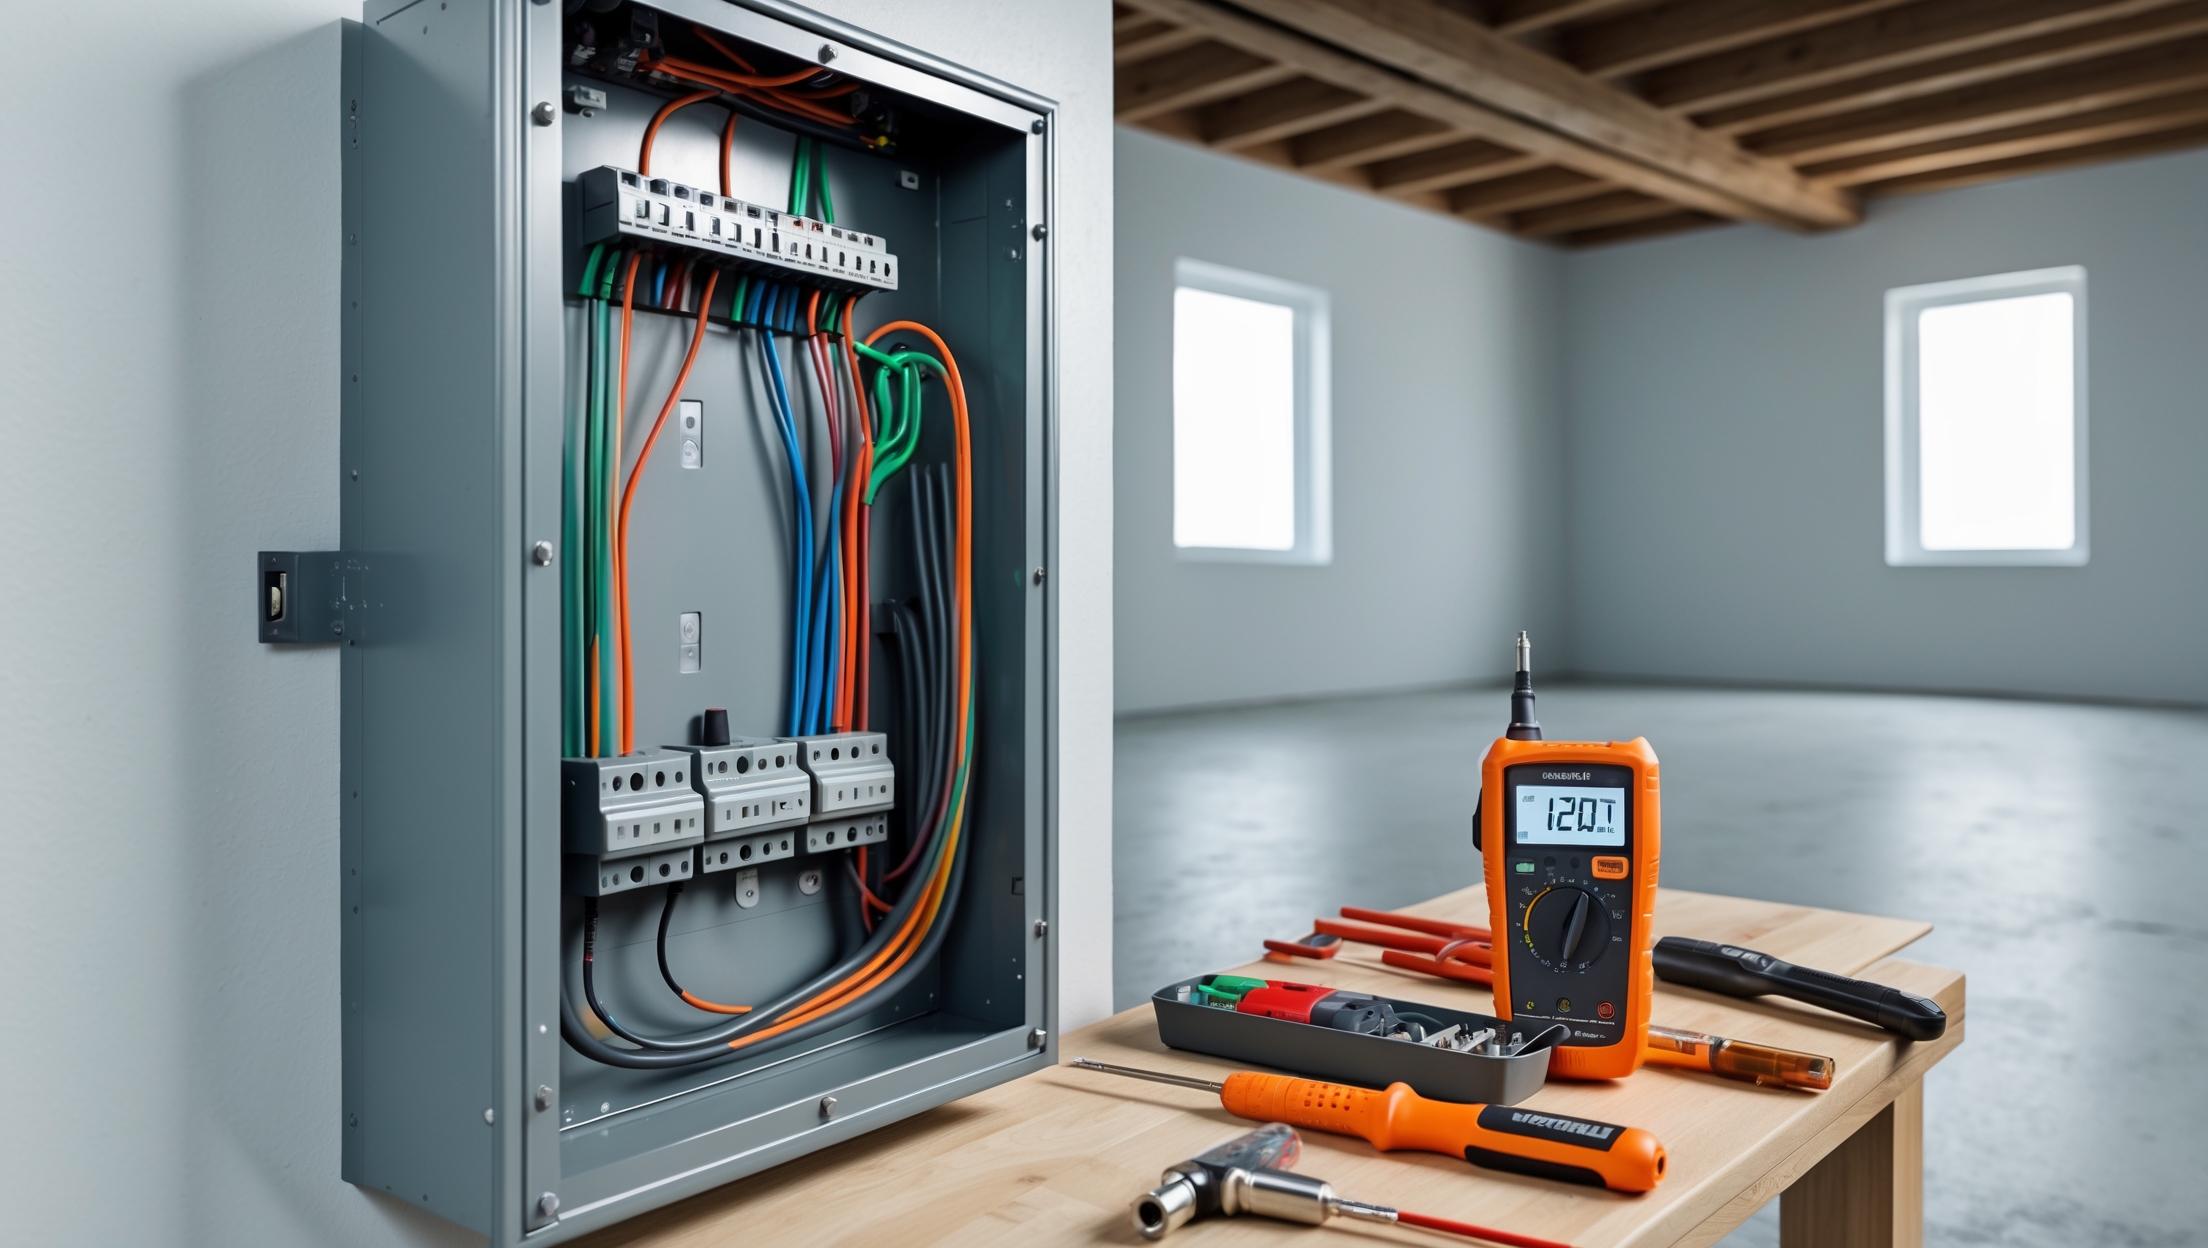
Tools and Equipment Guide: What You (and Your Contractor) Will Need
- Non-contact voltage tester – For confirming circuits are de-energized before work.
- Insulated screwdrivers and pliers – Prevent accidental shorts and shocks.
- Fish tape or wire pullers – For routing new wires through existing walls.
- Drill and bits – Drilling holes for cable runs and mounting boxes.
- Wire strippers and cutters – For preparing and terminating wires.
- Circuit tracer – For identifying existing circuits behind walls.
- Label maker or markers – For clear circuit identification.
- Arc-fault and ground-fault testers – To verify safety device operation.
- Personal protective equipment (PPE) – Gloves, safety glasses, and insulated footwear.
Professionals will also use panel knockout punches, conduit benders, voltage/amperage meters, and lockout/tagout devices for maximum safety.
Insurance and Warranty Essentials
Notifying Your Insurer
Contact your homeowner’s insurance company before starting work. Some policies require notification or documentation of major electrical upgrades to maintain coverage. Ask about potential discounts for code-compliant systems or added safety features (AFCIs, GFCIs).
Protecting Your Investment
- Save all receipts, permits, and inspection reports.
- Ask your electrician about parts and labor warranties—many reputable contractors offer at least a one-year guarantee.
- Document the upgrade with photos for future claims or resale value.
Real-Life Case Studies: Lessons from the Field
Case Study 1: The Costly Permit Shortcut
A homeowner in the Midwest upgraded their panel from 100A to 200A without pulling a permit. When selling the home, the buyer’s inspector flagged unapproved work. The city required a costly re-inspection and full rework to meet code, costing the seller $3,500 and delaying the sale.
Case Study 2: Underestimating Outdated Wiring
An older home appeared to only need a panel and a few new circuits. During the upgrade, the electrician discovered widespread knob-and-tube wiring, requiring a full rewire to pass inspection. The homeowner’s original $3,000 budget ballooned to $12,000 but resulted in a safer, insurable home.
Case Study 3: DIY Gone Wrong
A DIYer replaced several outlets and switches but failed to confirm all power was off. A shock sent them to the ER, and an improperly grounded outlet created an ongoing shock risk. A pro was called in to correct dangerous mistakes and rewire several circuits.
Maintenance and Future-Proofing Your Electrical System
Routine Maintenance Tips
- Test GFCI and AFCI outlets monthly using the built-in test button.
- Check for warm spots, buzzing sounds, or flickering lights—signs of trouble.
- Keep the area around your panel clear and accessible.
- Have your system inspected by a pro every 5–7 years, or after major renovations.
Planning for Future Needs
- Consider panel upgrades that allow for expansion (extra breaker slots, higher ampacity).
- Install conduit in accessible areas for easy future circuit additions.
- Label circuits clearly and maintain an updated diagram of your electrical system.
- Discuss surge protection options to safeguard electronics from power spikes.
Conclusion: Empowering Your Electrical Upgrade with Knowledge
Electrical upgrades are among the most important—and potentially hazardous—home improvements you can make. Taking shortcuts on permits, code compliance, or safety can lead to devastating consequences, from costly rework and failed inspections to catastrophic fires or bodily harm. Yet with careful planning, a clear understanding of project scope and costs, and the right team of professionals, you can transform your home’s power infrastructure for decades of safety, convenience, and value.
Remember to start with a full assessment of your needs, choose a licensed and reputable contractor, and never skip permits or inspections. Budget realistically, build in a contingency fund, and keep meticulous documentation from start to finish. Above all, respect the power of electricity—know when to DIY and when to call in a pro. Prioritize safety equipment, clear labeling, and routine maintenance to keep your upgraded system running smoothly.
By learning from common pitfalls and arming yourself with these expert insights, you’ll avoid costly mistakes and enjoy a safer, smarter, and more reliable home. Your future self—and your family—will thank you every time you flip the switch.
The article mentions that even minor mistakes during electrical upgrades can cause failed inspections or code violations. If I just want to add a few outlets to older wiring, what’s the best way to make sure I stay compliant with current codes?
To stay compliant when adding outlets to older wiring, start by checking your local electrical codes, as requirements can vary. Use outlets and wiring that meet current standards, and never connect new outlets to ungrounded or outdated wiring. It’s a good idea to hire a licensed electrician, who will know how to update your system safely and ensure everything passes inspection.
For someone adding outlets and a circuit for new appliances, what are the main cost factors to keep in mind when budgeting? Are labor and permits usually the biggest expenses, or does the type of wiring and equipment make a bigger difference in the total price?
When budgeting for new outlets and a circuit, labor and permits are often significant expenses, especially if you hire a licensed electrician or your area has strict code requirements. However, the type of wiring, outlets, breakers, and other equipment can also add up, particularly if you need specialized materials for higher-power appliances. In most cases, labor and permits are the largest costs, but equipment costs can rise depending on your specific needs and appliance requirements.
You mentioned adding circuits for electric vehicle charging. How much extra does that typically add to an upgrade project, and are there ways to future-proof my system without committing to that expense right now?
Adding a dedicated circuit for electric vehicle charging usually increases the upgrade cost by $500 to $1,500, depending on factors like wiring distance and panel capacity. To future-proof your system without installing the circuit now, consider upsizing your main electrical panel and leaving extra space for breakers. You can also install conduit to the garage during your upgrade, making it easier and less expensive to add a charging circuit later.
Could you clarify any hidden costs homeowners commonly overlook when budgeting for a full house rewiring, especially concerning permits or unexpected code updates? I’m trying to plan ahead and want to avoid financial surprises once the project is underway.
Homeowners often miss costs like permit fees, which can vary by location and add up quickly. Unexpected expenses can also arise if the wiring project uncovers outdated or unsafe components that need replacement to meet current codes. Additionally, some local regulations may require smoke detectors, arc-fault breakers, or upgrades to the main electrical panel. It’s wise to include a contingency fund, usually 10-20% of your budget, to cover these unforeseen requirements.
You mention that electrical upgrades can trip up even experienced contractors. What are some common code violations or surprise costs homeowners should watch out for during a main service panel upgrade, especially when shifting from 100A to 200A service?
During a main service panel upgrade from 100A to 200A, common code violations include improper grounding or bonding, using undersized service entrance cables, and failing to install the correct main disconnect. Surprise costs can come from needing to upgrade the meter socket, replacing or relocating the main panel, or bringing older wiring up to current code. Utility companies may also charge for new connections or require inspections before activation, so it’s smart to budget for these possibilities.
You mention upgrading from a 100A to a 200A main service panel as a major project. How can I tell if I really need to go all the way to 200A, or would a subpanel or partial rewiring be enough for most homes built in the 1970s?
To determine if you need a full upgrade to a 200A main panel, consider your current and future electrical needs. If you plan to add large appliances, electric vehicles, or major renovations, 200A may be necessary. For many 1970s homes, a subpanel or partial rewiring can often address smaller increases in demand. An electrician can perform a load calculation to assess your current usage and recommend the right solution.